Get started with Amazon EC2

Hi there! 👋 I'm Daniel Ozoemena, a passionate Cloud Solution Architect and DevOps Engineer dedicated to building scalable, secure, and innovative cloud solutions. With hands-on experience in Azure, AWS, and Google Cloud Platform, I specialize in deploying infrastructure as code, automating workflows, and optimizing system reliability. Driven by a love for problem-solving, I constantly explore new technologies and best practices to deliver impactful results. Beyond the cloud, I enjoy mentoring, blogging about tech insights, and contributing to open-source projects. When I'm not automating deployments or creating secure virtual networks, you can find me playing chess, learning about AI, or brainstorming solutions to real-world challenges. Let’s connect and grow together on this tech journey! 🚀
Use this tutorial to get started with Amazon Elastic Compute Cloud (Amazon EC2). You'll learn how to launch and connect to an EC2 instance. An instance is a virtual server in the AWS Cloud. With Amazon EC2, you can set up and configure the operating system and applications that run on your instance.
Overview
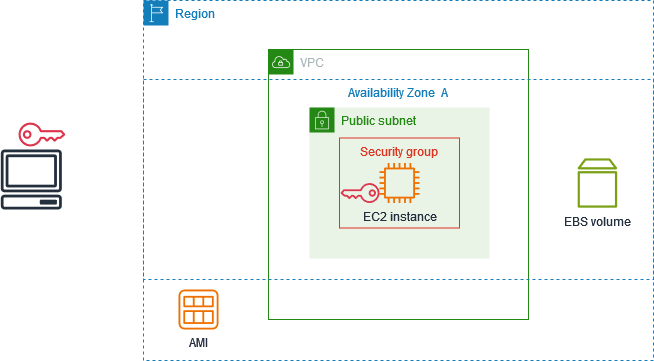
The following diagram shows the key components that you'll use in this tutorial:
An image – A template that contains the software to run on your instance, such as the operating system.
A key pair – A set of security credentials that you use to prove your identity when connecting to your instance. The public key is on your instance and the private key is on your computer.
A network – A virtual private cloud (VPC) is a virtual network dedicated to your AWS account. To help you get started quickly, your account comes with a default VPC in each AWS Region, and each default VPC has a default subnet in each Availability Zone.
A security group – Acts as a virtual firewall to control inbound and outbound traffic.
An EBS volume – We require a root volume for the image. You can optionally add data volumes.
Step 1: Launch an instance
You can launch an EC2 instance using the AWS Management Console as described in the following procedure. This tutorial is intended to help you quickly launch your first instance, so it doesn't cover all possible options.
To launch an instance
- Open the Amazon EC2 console at https://console.aws.amazon.com/ec2/.

- In the navigation bar at the top of the screen, we display the current AWS Region — for example, Ohio. You can use the selected Region, or optionally select a Region that is closer to you.

- From the EC2 console dashboard, in the Launch instance pane, choose Launch instance.

- Under Name and tags, for Name, enter a descriptive name for your instance.

Under Application and OS Images (Amazon Machine Image), do the following:
- Choose Quick Start, and then choose the operating system (OS) for your instance. For your first Linux instance, we recommend that you choose Amazon Linux.

- From Amazon Machine Image (AMI), select an AMI that is marked Free Tier eligible.
- Under Instance type, for Instance type, choose
t2.micro, which is eligible for the Free Tier. In Regions wheret2.microis not available,t3.microis eligible for the Free Tier.

Under Key pair (login), for Key pair name, choose an existing key pair or choose Create new key pair to create your first key pair.

Under Network settings, notice that we selected your default VPC, selected the option to use the default subnet in an Availability Zone that we choose for you, and configured a security group with a rule that allows connections to your instance from anywhere. For your first instance, we recommend that you use the default settings. Otherwise, you can update your network settings as follows:
(Optional) To use a specific default subnet, choose Edit and then choose a subnet.
(Optional) To use a different VPC, choose Edit and then choose an existing VPC. If the VPC isn't configured for public internet access, you won't be able to connect to your instance.
(Optional) To restrict inbound connection traffic to a specific network, choose Custom instead of Anywhere, and enter the CIDR block for your network.
(Optional) To use a different security group, choose Select existing security group and choose an existing security group. If the security group does not have a rule that allows connection traffic from your network, you won't be able to connect to your instance. For a Linux instance, you must allow SSH traffic. For a Windows instance, you must allow RDP traffic.

Under Configure storage, notice that we configured a root volume but no data volumes. This is sufficient for test purposes.
Review a summary of your instance configuration in the Summary panel, and when you're ready, choose Launch instance.

If the launch is successful, choose the ID of the instance from the Success notification to open the Instances page and monitor the status of the launch.
Select the checkbox for the instance. The initial instance state is
pending. After the instance starts, its state changes torunning. Choose the Status and alarms tab. After your instance passes its status checks, it is ready to receive connection requests.

Step 2: Connect to your instance
Linux instances
You can connect to your Linux instance using any SSH client. If you are running Windows on your computer, open a terminal and run the ssh command to verify that you have an SSH client installed. If the command is not found, install OpenSSH for Windows.
To connect to your instance using SSH
Open the Amazon EC2 console at https://console.aws.amazon.com/ec2/.
In the navigation pane, choose Instances.
Select the instance and then choose Connect.
On the Connect to instance page, choose the SSH client tab.
(Optional) If you created a key pair when you launched the instance and downloaded the private key (.pem file) to a computer running Linux or macOS, run the example chmod command to set the permissions for your private key.
Copy the example SSH command. The following is an example, where
key-pair-name.pem is the name of your private key file,ec2-useris the username associated with the image, and the string after the @ symbol is the public DNS name of the instance.ssh -i key-pair-name.pem ec2-user@ec2-198-51-100-1.us-east-2.compute.amazonaws.comIn a terminal window on your computer, run the ssh command that you saved in the previous step. If the private key file is not in the current directory, you must specify the fully-qualified path to the key file in this command.
The following is an example response:
 The authenticity of host 'ec2-198-51-100-1.us-east-2.compute.amazonaws.com (198-51-100-1)' can't be established.
 ECDSA key fingerprint is l4UB/neBad9tvkgJf1QZWxheQmR59WgrgzEimCG6kZY.
 Are you sure you want to continue connecting (yes/no)?
(Optional) Verify that the fingerprint in the security alert matches the instance fingerprint contained in the console output when you first start an instance. To get the console output, choose Actions, Monitor and troubleshoot, Get system log. If the fingerprints don't match, someone might be attempting a man-in-the-middle attack. If they match, continue to the next step.
Enter
yes.The following is an example response:
Warning: Permanently added 'ec2-198-51-100-1.us-east-2.compute.amazonaws.com' (ECDSA) to the list of known hosts.
Step 3: Clean up your instance
You'll stop incurring charges for that instance or usage that counts against your Free Tier limits as soon as the instance status changes to shutting down or terminated. To keep your instance for later, but not incur charges or usage that counts against your Free Tier limits, you can stop the instance now and then start it again later. For more information, see Stop and start Amazon EC2 instances.
To terminate your instance
In the navigation pane, choose Instances. In the list of instances, select the instance.
Choose Instance state, Terminate instance.
Choose Terminate when prompted for confirmation.
Amazon EC2 shuts down and terminates your instance. After your instance is terminated, it remains visible on the console for a short while, and then the entry is automatically deleted. You cannot remove the terminated instance from the console display yourself.


